 Price Match
 Excellent support
 Trustpilot
 FREE Delivery over £99*
 Spread payments with Klarna
by Pablo Bellinghausen
 –
If you make music at home and you are worried about your neighbours complaining – or conversely, if you have noisy neighbours and you would like to keep the levels down on your end – then you might want to consider soundproofing options for your room.
As we saw in our previous instalment, effective soundproofing can be very difficult to achieve, and if not done properly one can end up paying a lot of money for barely noticeable results.
The first thing to make abundantly clear is that there is no way to properly insulate a space without a certain amount of building work. All surfaces need to be covered by dense, heavy materials, and several layers of absorbers. There are two types of noise, airborne and impact sound, and effective soundproofing uses a mixture of mass, decoupling, damping, and absorption to contain both.
If you have the money, consulting a professional builder to do the job is by far the most reliable way to get satisfying results. However, even on a smaller budget, there are relatively straightforward insulation options at the DIY level. They won't stop your neighbours from complaining if you have a drum kit right next door to them, but it will likely allow you to record vocals and guitars, as well as producing and mixing, without problems.
It is relatively easy to improve insulation in a room with serious sound leakage problems – up to a point. Once a certain amount of surface isolation is reached, the main problem will be the sound transmission coming from the whole of the building structure, usually seeping through the corners between the walls and the floor or ceiling. This is called "flanking", and there is no way to prevent that without quite literally creating a fully decoupled, airtight "room within a room" structure.

Flanking noise spreads through the entire building structure, not just through walls
However, before one reaches the threshold at which flanking is the biggest problem, it is possible to increase isolation relatively easily by using some of the following methods.
Soundproofing Curtains
The easiest, cheapest, and least permanent (although of course least effective) solution is to hang a couple of layers of "soundproof-level" curtains or blankets. Two layers of thick, heavy industrial curtains (usually made of a combination of vinyl and/or fibreglass quilt with a fabric cover) will noticeably attenuate noise when placed in front of open windows (better still if taped to the wall at the edges) but can even be surprisingly helpful when placed in front of thin or single-glazed windows, doors, or even thin walls.

Soundproofing curtains can be surprisingly effective in rooms with serious leakage problems
Windows
Whenever possible, double-glazed windows will of course yield the most insulation (and should really be a standard in most buildings). Pro studios will often have two very thick glass panels (3/4" or even 1") with at least a couple of inches of space in between the two. As mentioned above, soundproofing-grade curtains will help somewhat (particularly if the windows need to be open every once in a while), but a relatively easy way to improve upon that is to create a DIY panel, cut to size in order to be inserted flush into the window frame. The panel should be made of a couple of stiff wooden boards, as many layers of mass-loaded vinyl as possible between the two, and acoustic foam on the inside surface, the lot tightly covered with any fabric. If the window frame is too small to support this kind of structure, then a thicker one can easily be made out of wood and be attached onto the wall around the original window frame for the same effect. It will of course block all the light, but should block much of the sound as well.

Construction of a removable soundproofing panel for windows
Doors
After windows, doors are usually the weakest link in most rooms, since they are large, usually made of thin, sometimes even hollow wood, and with space between the door and the frame. The ideal solution is always to have two offset doors with a small hallway in between the two, but really any double door system will hugely increase isolation. The doors themselves should be as heavy as possible; fire doors are usually the best option. However, if a normal wooden door has to be utilised, mass-loaded vinyl sheets can be placed between the door and an additional sheet of plywood to add mass and cover any small cracks in the original wood. The top, bottom and sides should be sealed up with purpose-made pressure rubber strips. Surface-mounted bottom strips work acceptably well, but it's best to screw a piece of pressure-treated timber on the floor at the same level as the door frame, and add a pressure seal strip on it as well. Just be careful not to trip over it! When a single door has been installed and more isolation is required, it is relatively straightforward to mount a second frame around the first one and add another fire door. The gap between them won't be as big as it would ideally be but it will definitely increase isolation compared to the single door.
 Installation of a fire door around the frame of the original one
Walls
Even though it is often true that treating a single wall is not going to be a drastic improvement over an untreated space in many cases, there are often times where it can be sufficient – in particular when it is about level attenuation between two adjacent spaces rather than an attempt to eliminate overall transmission. In the average house, a wall with enough soundproofing can make an improvement of over 10 dB of noise insulation compared with the original untreated wall. This is perceptually akin to halving the amount of sound leakage, and therefore a very commendable goal. The first and easiest way to improve insulation is to add a layer of drywall to the existing one, adding liberal amounts of a substance called Green Glue in between the two surfaces. An application of 2–3 tubes of Green Glue per 4×8 foot sheet (ideally 5/8" drywall), completely covering the original wall, leaving a 1/4" gap around the edges to be filled with acoustic sealant, can give you an improvement in isolation of up to 8 dB. Adding a couple of layers of mass-loaded vinyl can increase this by a couple of decibels. Do note that you still need to screw the drywall to the original one, as the inaptly named Green Glue does not "set" and therefore will not hold anything by itself. For even better isolation one would have to add a separate, decoupled wall in front of the original one, but at that point many other considerations need to be made (from distance between the walls, the type of frame and its decoupling from the floor and ceiling, to avoidance of the "triple leaf effect" which might require removal of the original drywall layer). At this point it might be a good idea to contact a professional to get things right.
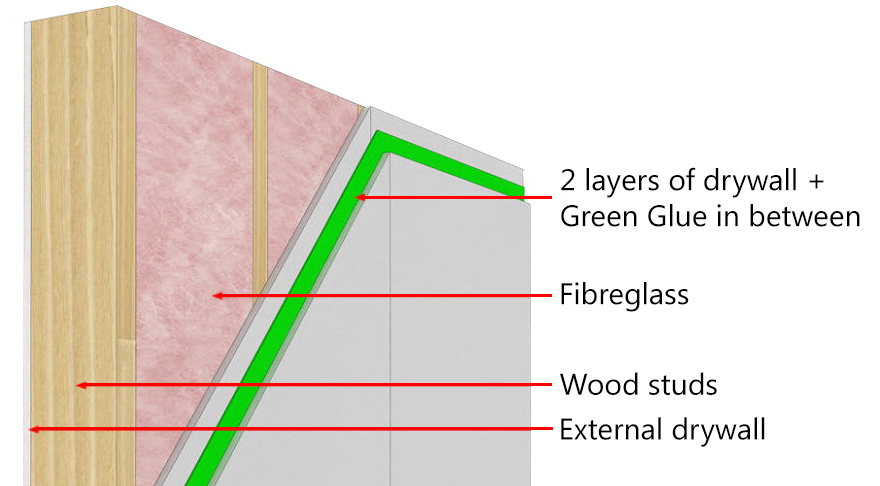
Adding just an extra layer of drywall with some Green Glue in between noticeably improves isolation
As mentioned at the beginning of the article, the main problem in most homes once this level of isolation is reached would be flanking noise coming from the floor and ceiling, which is impossible to treat with just wall treatment.
Floor
The floor itself is possibly the easiest part of the room to soundproof, since gravity is doing much of the work for you. However, it is the main surface that suffers from contact and impact noise (from footsteps to speaker vibration through either the table or stands) and therefore effective insulation can still be expensive. The easiest way to attenuate impact noise is a thick, plush carpet. In addition to that, foam pads under the speakers will help decouple them from whatever surface they are on. More sophisticated products like the GRAMMA range from Auralex can help decouple larger and heavier speakers, notably guitar amps and subwoofers. To attenuate airborne noise, the whole of the floor should be covered by a series of layers of high mass and damping materials; mass-loaded vinyl, high density rubber, and carpet underlay will all attenuate transmission onto the room below.

A few layers of absorbing and decoupling materials can easily be laid down on the floor of your studio
Hopefully your noise problems will be suitably attenuated by using the above techniques. However, do note that most of the above (with the exception of carpet) will keep more of the sound inside the room, making it more reflective; if you need the room to be suitable for recording, you will have to add acoustic treatment to suitably reduce the reverberation. For that we recommend one of our earlier articles, which you can read here. Happy recording!